
Last Tuesday, I found myself staring into my pantry at 3 PM with that familiar “I need something sweet RIGHT NOW” feeling. You know the one? When you could eat a whole cake but don’t want to deal with frosting, layers, or any fancy decorating nonsense. That’s when I remembered Grandma’s marble loaf cake sitting on her kitchen counter every Sunday afternoon, looking absolutely perfect with those gorgeous chocolate and vanilla swirls running through every slice.
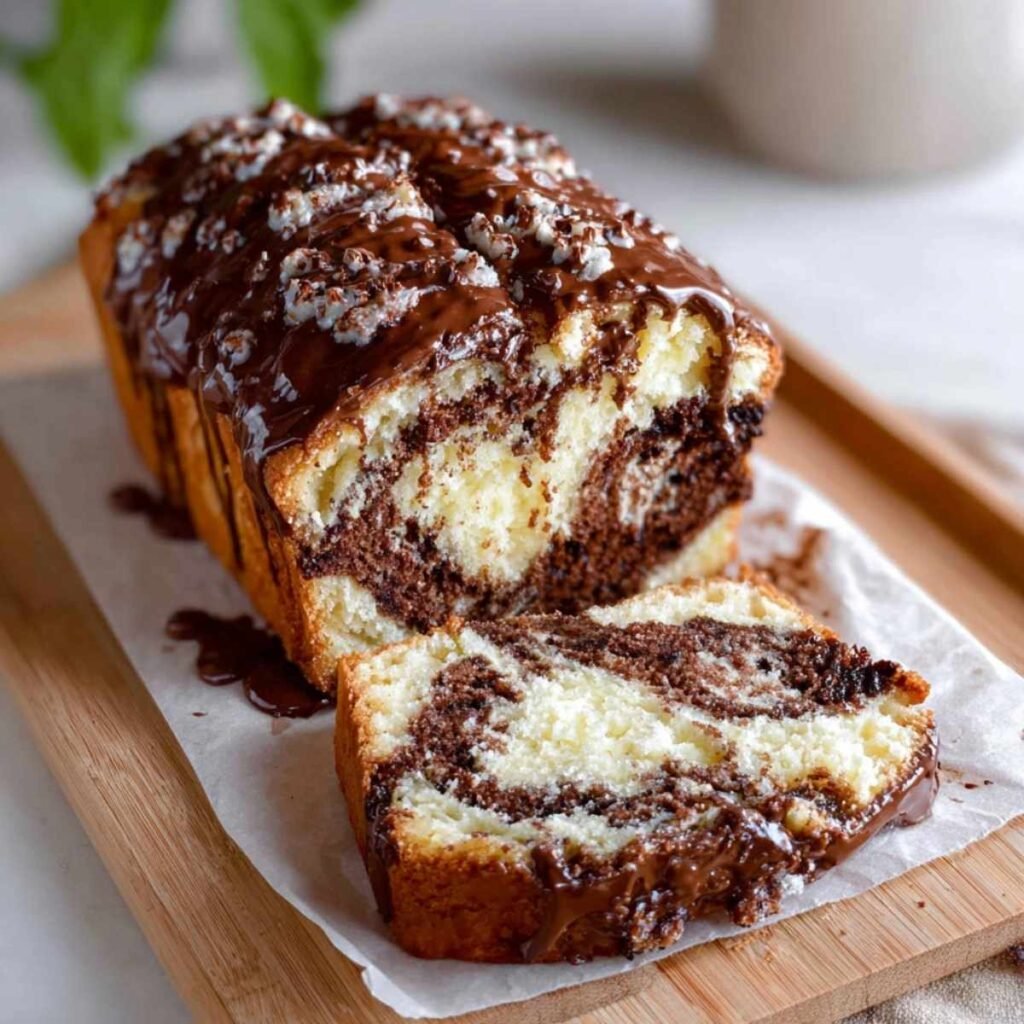
This vanilla and chocolate marble loaf cake recipe has become my go-to solution for those moments when you want impressive results without the stress. It’s a buttery, moist pound cake made in a loaf pan, swirled with vanilla and chocolate cake batter that creates the most beautiful patterns you’ve ever seen. The best part? This marble loaf cake recipe moist and foolproof, uses ingredients you definitely have on hand, and comes together faster than you can decide what to watch on Netflix.
Jump To
How to Make Marble Loaf Cake – Quick Summary
This best marble loaf cake recipe combines rich vanilla cake batter with chocolate mixture to create a swirled masterpiece that’s both elegant and comforting. The key to perfect marbling lies in the technique of layering and swirling rather than mixing completely. This chocolate marble loaf recipe delivers that classic buttery and tender crumb with beautiful chocolate and vanilla swirls that make every slice look bakery-perfect.
What You Need to Know
Total Time: 1 hour 15 minutes (15 min prep + 60 min bake)
Serves: 10 slices
Skill Level: Beginner-friendly
Key Secret: Don’t overmix the marbling for clean swirls
Equipment: 9×5 inch loaf pan
Storage: Wrapped tightly for up to 5 days
Why You’ll Love This Marble Loaf Cake Recipe
Honestly, there’s something so satisfying about cutting into a loaf and seeing those perfect marble swirls that are completely different in every single slice. It’s like opening a present each time you cut a piece because you never know exactly how the pattern is going to look. This vanilla and chocolate marble loaf cake with oil (though we’re using butter here for maximum flavor) gives you the best of both worlds without having to pick between chocolate and vanilla.
What I love most about this recipe is how forgiving it is. Unlike some finicky cakes that require perfect technique, this marble loaf cake with oil-style moisture and buttery richness practically makes itself. The batter comes together in one bowl, the marbling technique is actually fun rather than stressful, and even if your swirls don’t look Instagram-perfect, it still tastes absolutely incredible.
The texture is where this old fashioned marble pound cake recipe really wins though. Each bite is dense enough to be satisfying but still tender and moist. It’s the kind of cake that pairs equally well with your morning coffee or as an after-dinner treat. Plus, there’s something nostalgic about marble cake that just makes people happy.
For more simple loaf cake recipes that deliver big flavor, these lemon lavender loaf treats offer a completely different but equally delicious flavor profile that’s perfect for any time of day.
Ingredients for Marble Loaf Cake
This vanilla and chocolate marble loaf cake recipe uses simple ingredients that work together to create something that looks way more complicated than it actually is.
What You’ll Need
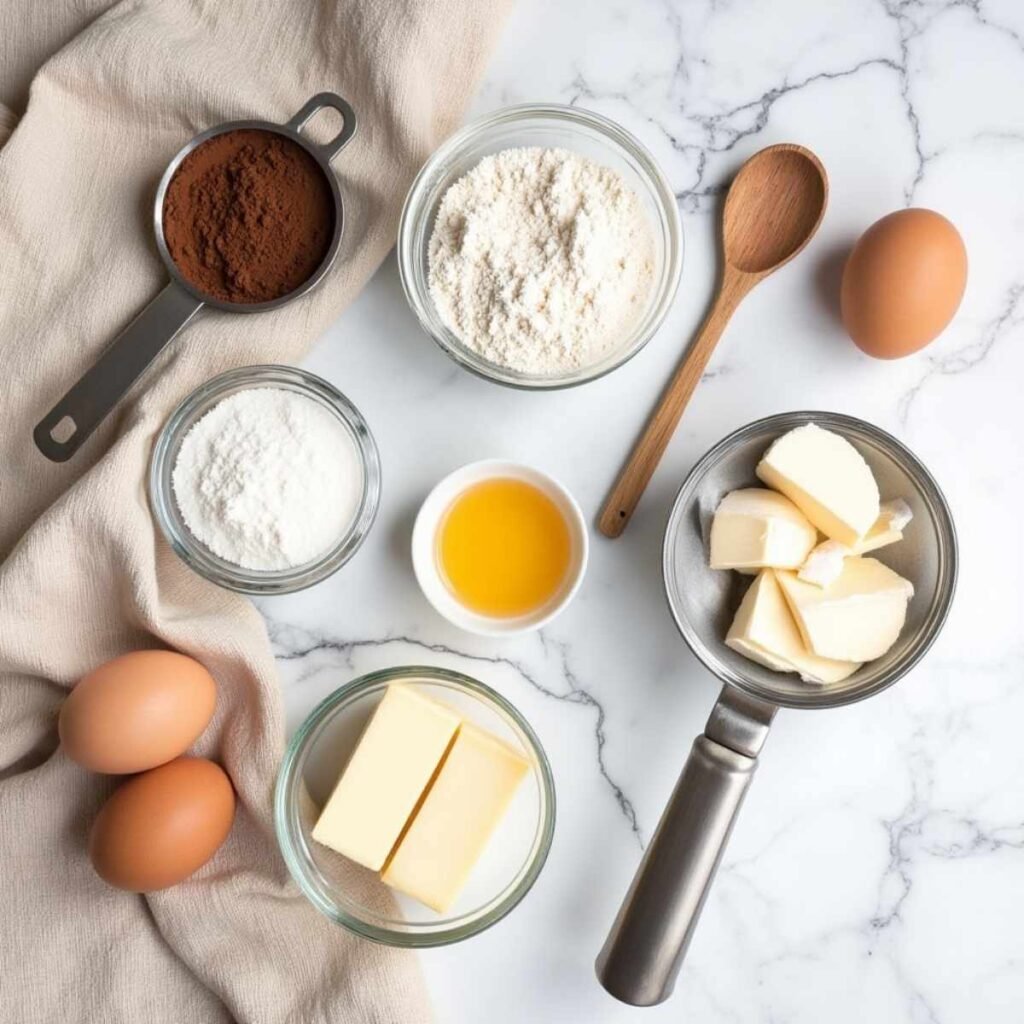
For the Base Batter:
- 1 3/4 cups all-purpose flour
- 1 1/2 teaspoons baking powder
- 1/2 teaspoon salt
- 1/2 cup (1 stick) unsalted butter, softened
- 1 cup granulated sugar
- 3 large eggs
- 1 teaspoon vanilla extract
- 2/3 cup whole milk
For the Chocolate Swirl:
- 1/4 cup unsweetened cocoa powder
- 3 tablespoons hot water
- 1 tablespoon sugar
Why These Ingredients Matter
The beauty of this best vanilla and chocolate marble loaf cake lies in its simplicity. We’re using butter instead of oil because it creates that classic pound cake richness and helps the flavors develop beautifully as the cake sits. The cocoa powder gets bloomed with hot water to intensify the chocolate flavor and create a smooth mixture that swirls easily without leaving dry pockets.
Using whole milk instead of buttermilk keeps the flavor clean and simple, letting both the vanilla and chocolate shine without competing flavors. The eggs provide structure and richness, while the vanilla extract in the base batter creates that classic cake flavor that makes this taste like childhood memories.
This soft, fluffy, moist marble cake technique creates beautiful layers without requiring any special skills or equipment. For more treats that showcase the magic of simple ingredients, try these mini brownie bites that prove sometimes the best desserts are the uncomplicated ones.
Instructions for Making Marble Loaf Cake
Step-by-Step Directions
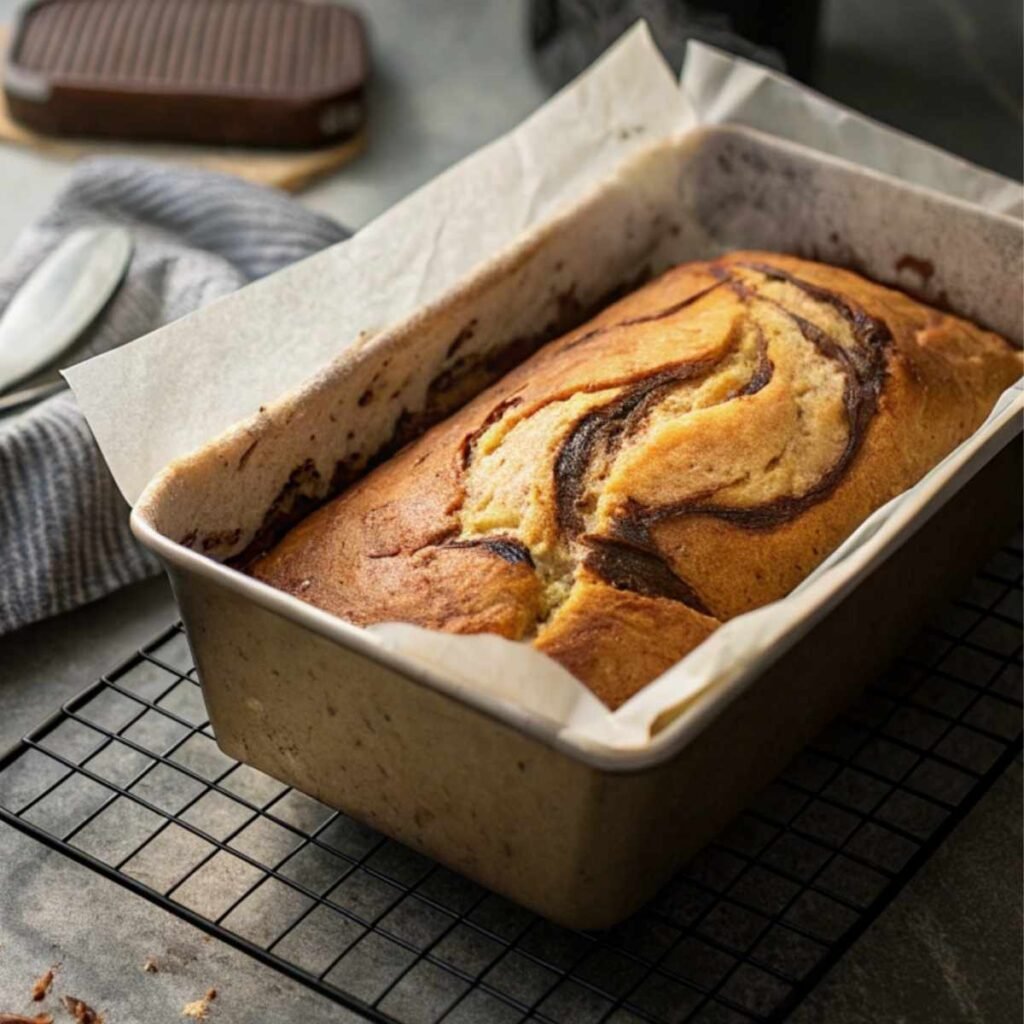
Step 1: Preheat your oven to 350°F and grease a 9×5 inch loaf pan thoroughly. Line with parchment paper leaving some overhang for easy removal later.
Step 2: In a medium bowl, whisk together flour, baking powder, and salt. Set aside because we’ll need this later.
Step 3: In a small bowl, whisk together cocoa powder, hot water, and 1 tablespoon sugar until smooth. The mixture should be thick but pourable. Let it cool while you make the main batter.
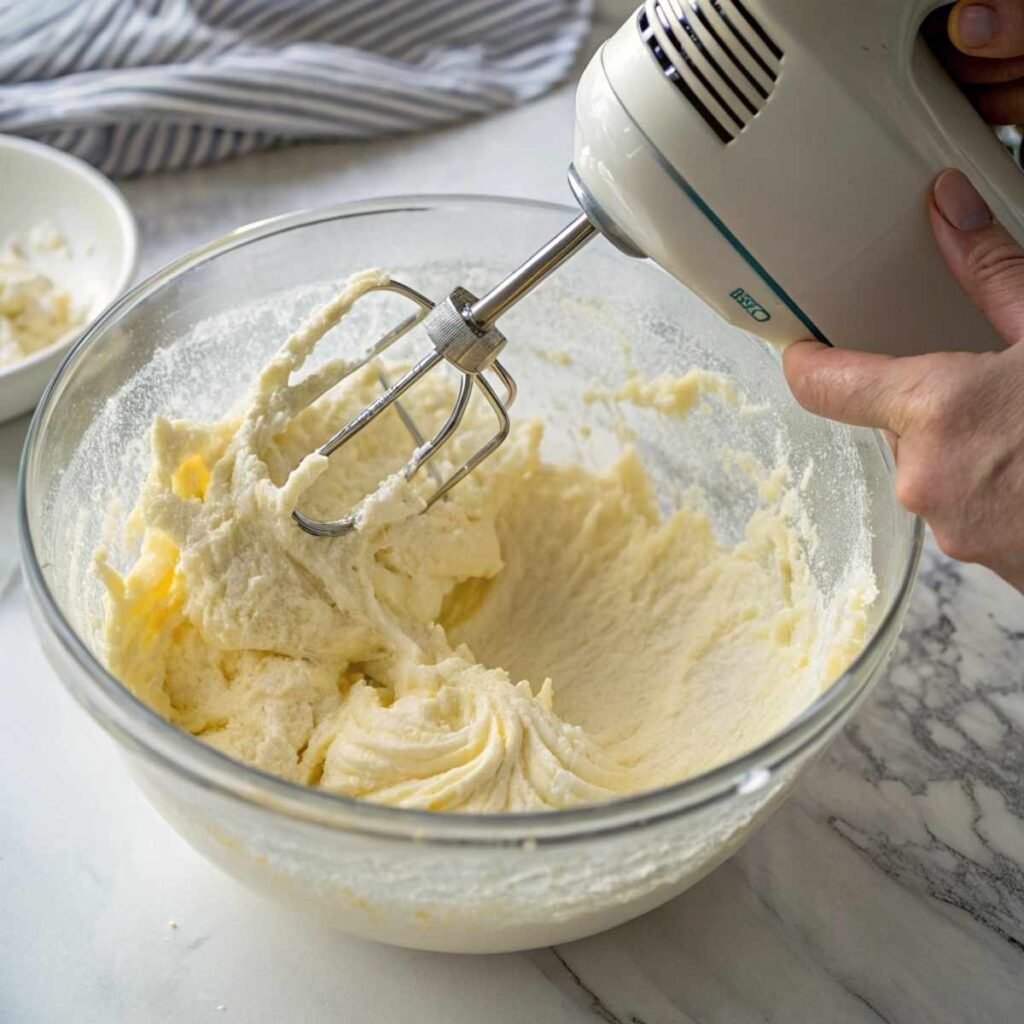
Step 4: In a large bowl, cream the softened butter and 1 cup sugar with an electric mixer until light and fluffy, about 3-4 minutes. This step is crucial for creating that tender crumb.
Step 5: Add eggs one at a time, beating well after each addition. Then mix in the vanilla extract until everything is well combined.
Step 6: Alternate adding the flour mixture and milk to the butter mixture, beginning and ending with flour. Mix just until combined after each addition. Don’t overmix or the cake will be tough.
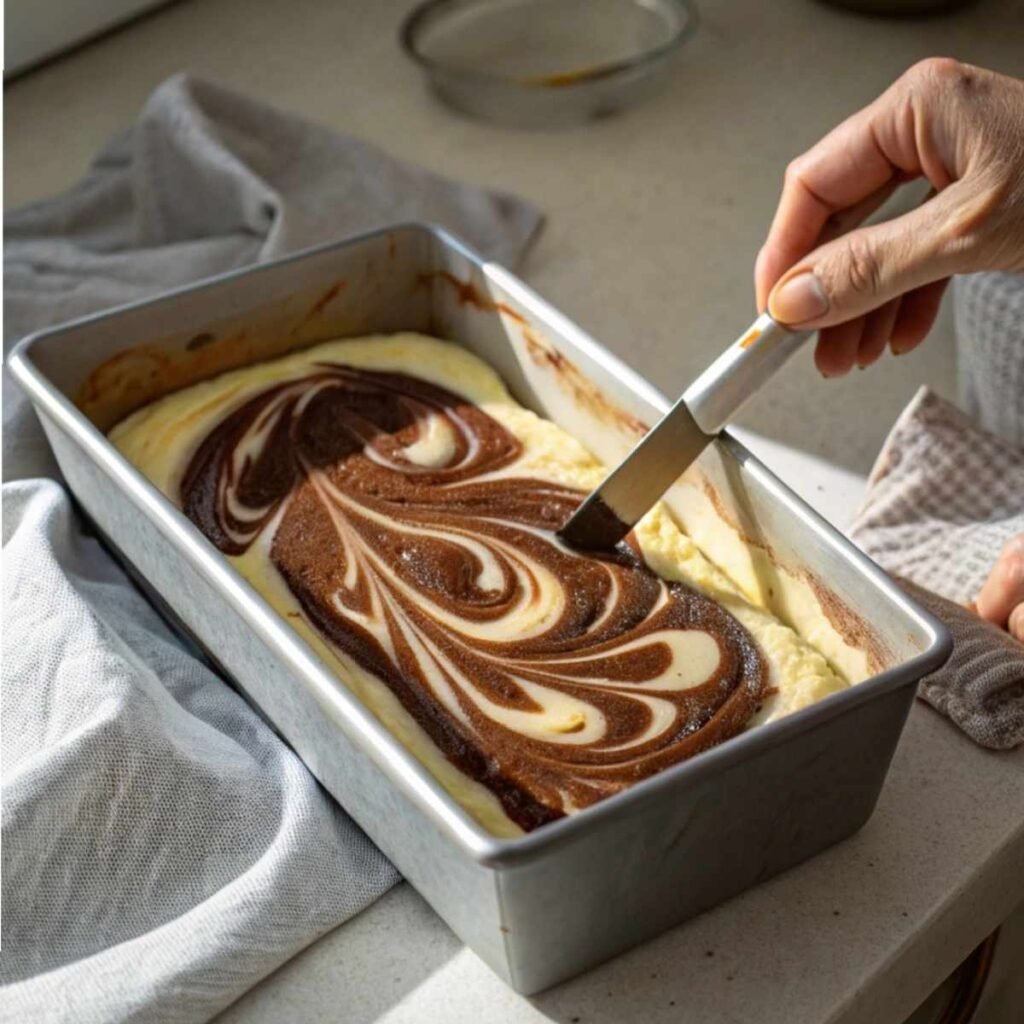
Step 7: Pour about 2/3 of the vanilla batter into your prepared loaf pan, spreading it evenly.
Step 8: Add about 1/2 cup of the remaining vanilla batter to the cooled chocolate mixture and stir until just combined. This creates the perfect consistency for marbling.
Step 9: Drop spoonfuls of the chocolate mixture over the vanilla batter in the pan, then top with the remaining vanilla batter.
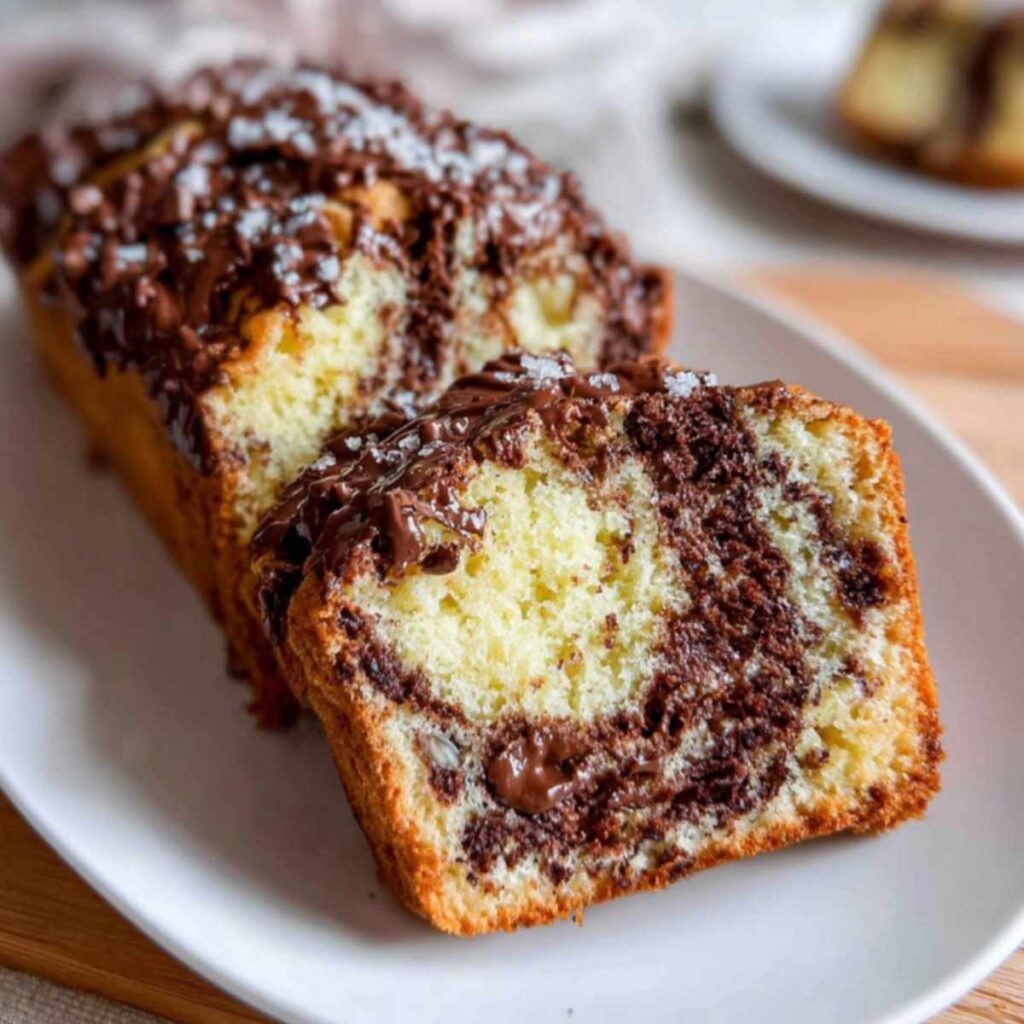
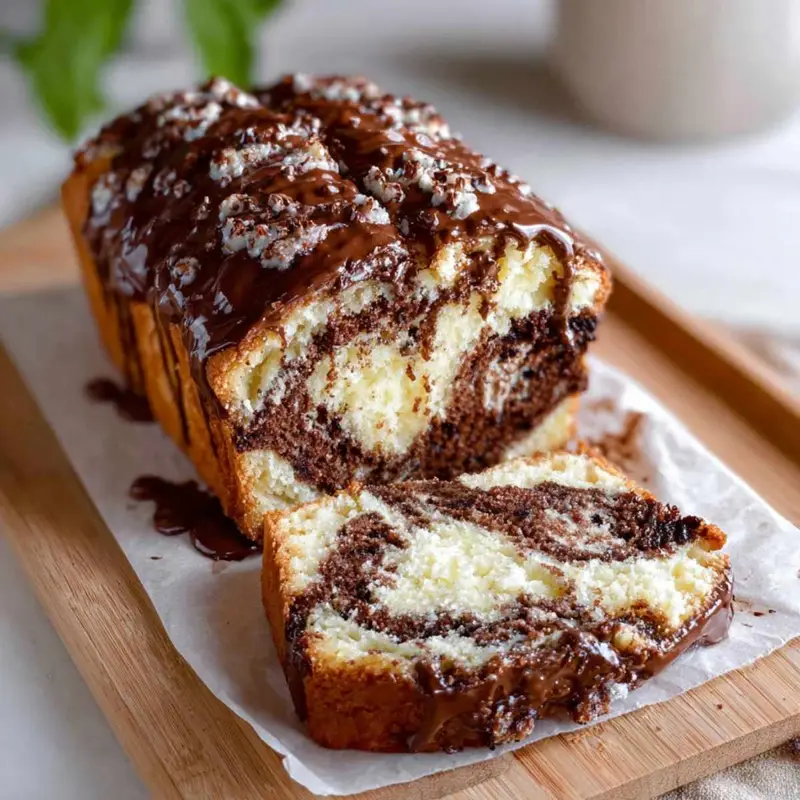
Step 10: Use a knife to gently swirl through the batters, creating marble patterns. Don’t overmix, just 3-4 gentle swirls to create those beautiful streaks.
Step 11: Bake for 55-65 minutes, or until a toothpick inserted in the center comes out with just a few moist crumbs attached.
Step 12: Cool in the pan for 10 minutes, then use the parchment overhang to lift out and cool completely on a wire rack.
Hint: The key to perfect marbling is restraint. Less swirling creates more defined patterns, while too much mixing turns it into chocolate cake instead of marble. Trust the process and stop when you think you should do just one more swirl.
Top Tip
chniques I’ve learned through lots of trial and error:
- Room temperature ingredients are everything – Cold butter won’t cream properly and cold eggs can cause the batter to curdle. Plan ahead and take everything out about an hour before baking.
- Bloom your cocoa powder – Mixing cocoa with hot water activates its flavor and prevents chalky texture in the final cake.
- Don’t overmix the marbling – Think of it as painting rather than stirring. You want distinct swirls, not muddy brown cake.
- Check doneness carefully – Loaf cakes can look done on top while still being raw in the center. The toothpick test is your friend here.
- Cool completely before slicing – I know it’s tempting, but warm cake will crumble and you won’t see those beautiful marble patterns clearly.
- Wrap it up – This cake actually gets better after a day wrapped in plastic wrap. The flavors meld and the texture becomes even more tender.
The biggest mistake I see people make is rushing the marbling step. Take your time creating those step-by-step marbling instructions patterns, and you’ll be rewarded with a cake that looks like it came from a fancy bakery. For more baking wisdom, these cranberry coffee cake recipes teach similar patience techniques for perfect results.
Personal Anecdote
So there I was, age 16, trying to impress my boyfriend’s mom by making her “favorite” marble cake for Sunday dinner. I’d never made one before, but how hard could it be? I found a recipe online, gathered my ingredients, and dove right in with the confidence that only a teenager can possess.
Everything went wrong that could possibly go wrong. First, I forgot to soften the butter, so I tried to microwave it and ended up with butter soup. Then I got impatient with the marbling and basically stirred the whole thing into chocolate cake. The final disaster was when I tried to remove it from the pan too early and half of it stuck to the bottom.
I was standing in the kitchen holding this sad, broken, uniformly brown cake when Grandma walked in. Instead of laughing at my disaster, she just rolled up her sleeves and said, “Well Jazzy, looks like we’re making cake number two. Good thing I always keep extra ingredients around.” She taught me her marbling technique that day, showing me how gentle swirls create beautiful patterns while aggressive mixing just makes mud. His mom loved the second cake, and more importantly, I learned that the best baking teacher is sometimes a spectacular failure followed by patient guidance.
Substitutions for Marble Loaf Cake
Sometimes you need to work with what’s in your pantry, and I’ve tested these swaps in this vanilla and chocolate marble loaf cake with sour cream style approach:
Butter – You can use vegetable oil for a moister cake, but you’ll lose some of that rich, buttery flavor. Use 3/4 the amount of oil as butter called for.
Whole milk – Buttermilk adds a slight tang that’s delicious, or you can use sour cream thinned with a little milk for extra richness.
All-purpose flour – Cake flour makes it more tender, but reduce the amount to 1 1/2 cups since cake flour is lighter.
Eggs – Each egg can be replaced with 1/4 cup applesauce or mashed banana, though the texture will be slightly different.
Vanilla extract – Almond extract creates a different but lovely flavor, just use half the amount since it’s stronger.
Cocoa powder – In a pinch, you can use melted chocolate chips (about 2 oz), but let them cool before adding to prevent the batter from seizing.
The one substitution I don’t recommend is using a boxed cake mix as the base. The texture and flavor just aren’t the same, and you lose that homemade quality that makes this single-recipe marble cake special.
Variations on Marble Loaf Cake
Once you’ve mastered this easy vanilla and chocolate marble loaf cake, there are so many fun ways to switch up the flavors:
Orange Chocolate Marble – Add orange zest to the vanilla batter and a touch of orange extract to the chocolate mixture for a citrusy twist.
Strawberry Vanilla Marble – Replace the chocolate mixture with strawberry puree mixed with a little flour for a pink and white marble effect.
Coffee Marble – Add instant espresso powder to the chocolate mixture for a mocha flavor that’s absolutely divine with morning coffee.
Lemon Blueberry Marble – Fold fresh blueberries into half the vanilla batter and add lemon zest to the other half for a fruit marble effect.
Peanut Butter Chocolate – Replace some of the vanilla batter with peanut butter for that classic flavor combination.
Spiced Marble – Add cinnamon and nutmeg to the vanilla batter and extra cocoa to the chocolate for a spiced version perfect for fall.
Each variation keeps that same tender, moist texture while giving you completely new flavor combinations to explore. For more creative loaf ideas, try these easy Oreo cupcakes that showcase how simple techniques can create impressive results.
Equipment for Marble Loaf Cake
Getting this marble pound cake recipe right depends a lot on having the right tools for the job:
9×5 inch loaf pan – This size is crucial for proper baking time and texture. Too small and it’ll overflow, too large and it’ll be flat and overbaked.
Electric mixer – Hand or stand mixer both work, but you need something with enough power to properly cream the butter and sugar for that light, fluffy texture.
Wire whisk – For combining dry ingredients and making sure there are no lumps hiding in your flour mixture.
Rubber spatula – Essential for folding ingredients together gently and creating those beautiful marble swirls without overmixing.
Sharp knife – For the marbling technique. A butter knife works, but a sharp paring knife gives you more control over the swirl patterns.
Parchment paper – Makes removal so much easier and prevents sticking, especially important with this buttery batter.
If you don’t have parchment paper, make sure to grease your pan really well with butter and dust it with flour. The last thing you want is this beautiful cake stuck to the pan.
Storage Tips for Marble Loaf Cake
This marble loaf cake recipe actually gets better with time, but you need to store it right to maintain that perfect moist texture:
Room temperature storage: Wrap tightly in plastic wrap or store in an airtight container for up to 5 days. The flavors actually improve after the first day as everything melds together.
Refrigeration: If your kitchen is really warm, you can refrigerate it, but bring it back to room temperature before serving for the best texture and flavor.
Freezing: This cake freezes beautifully for up to 3 months. Wrap individual slices in plastic wrap and then foil, or freeze the whole loaf wrapped tightly.
Gifting tip: This cake travels well and makes a perfect neighbor gift or potluck contribution. Just wrap it in plastic wrap and tie with a pretty ribbon.
Slicing advice: Use a sharp serrated knife and wipe it clean between cuts to keep those marble patterns looking crisp and clean.
The key is keeping air away from the cake to prevent it from drying out while allowing those vanilla and chocolate flavors to develop.
What to Serve With Marble Loaf Cake
This vanilla and chocolate marble loaf cake is perfect on its own, but sometimes you want to dress it up:
Coffee pairings: This cake was made for coffee. The vanilla and chocolate flavors complement both light and dark roasts beautifully.
Fresh berries: Strawberries or raspberries add a pop of color and a tart contrast that balances the rich cake perfectly.
Ice cream: A scoop of vanilla ice cream turns this into a proper dessert, or try coffee ice cream for a sophisticated twist.
Whipped cream: Light and fluffy whipped cream with a touch of vanilla makes this feel more special without overpowering the cake.
Dusting options: A light dusting of powdered sugar makes it look bakery-pretty, or try a drizzle of simple glaze made with powdered sugar and milk.
Tea time: This cake is perfect with afternoon tea or coffee, sliced thin and served on pretty plates.
The goal is to enhance the cake without competing with those beautiful marble flavors. For more dessert ideas that complement this classic, try these Belgian waffle recipe creations that pair wonderfully for weekend brunch spreads.
Grandma’s Secret for Marble Loaf Cake
“Jazzy, the secret to perfect marble cake isn’t in the recipe, it’s in knowing when to stop,” Grandma told me while watching me practice my swirling technique for the hundredth time. Her biggest tip? Create your chocolate mixture slightly thicker than you think you need. “Thin chocolate just disappears into the vanilla, but thick chocolate holds its own and creates those beautiful ribbons,” she explained.
Her other trick was something she called the “figure-eight method.” Instead of just randomly swirling, she’d draw figure-eights through the batter with a knife, overlapping them slightly. This created the most gorgeous, even marble patterns that looked professional every time.
This buttery loaf with its perfect vanilla and chocolate swirls proves that sometimes the most beautiful desserts are also the simplest.
FAQ about Marble Loaf Cake
How to get marble effect in cake?
The key is layering your batters and then gently swirling with a knife or skewer. Don’t overmix – just draw the knife through in figure-eight patterns to create distinct swirls. The chocolate mixture should be thick enough to hold its shape while still being swirl-able.
What is the best filling for a marble cake?
Marble cake is traditionally unfilled, with the beauty coming from the vanilla and chocolate swirls throughout the cake itself. However, you could add a simple glaze or serve with whipped cream if you want something extra.
What is the difference between zebra cake and marble cake?
Zebra cake uses alternating spoonfuls of chocolate and vanilla batter to create distinct striped patterns, while marble cake swirls the two batters together for a more organic, marbled appearance. Both are delicious but create very different visual effects.
What are the ingredients in marble cake?
Basic marble cake uses flour, sugar, butter, eggs, milk, vanilla extract, and cocoa powder. The vanilla batter forms the base, and cocoa powder mixed with liquid creates the chocolate portion that gets swirled through for the marble effect.
Conclusion
You know what’s amazing about this marble loaf cake? Every single slice tells a different story with its unique swirl pattern, but they all taste exactly like comfort and nostalgia rolled into one perfect bite. This vanilla and chocolate marble loaf cake recipe has become my secret weapon for those times when I want something impressive but don’t have the energy for complicated decorating or multiple layers. The best marble loaf cake recipe doesn’t need fancy techniques or hard-to-find ingredients, just a little patience and the willingness to trust the process.
What I love most is how this cake makes everyone feel like a kid again, trying to decide which bite has the perfect ratio of chocolate to vanilla. There’s something so satisfying about creating those beautiful swirls and knowing that each slice will be a little surprise. This marble loaf cake starbucks-style perfection comes from your own kitchen, and honestly, tastes even better because you made it yourself.
If you’re looking for more simple dessert recipes that deliver big flavor without the fuss, I found these incredible tahini dessert recipes that showcase how unexpected ingredients can create the most amazing treats. Sometimes the best discoveries come from trying something completely different.
For more delicious treats that showcase the beauty of simple techniques, don’t miss these cookies and cream donuts that prove homemade always beats store-bought when it comes to creating moments that matter around the kitchen table.
Vanilla and Chocolate Marble Loaf Cake
Equipment
- 1 9×5-inch loaf pan Grease and line with parchment for easy removal
- 1 Hand or stand mixer For creaming butter and sugar
- 1 Rubber spatula Helps fold and swirl batter without overmixing
- 1 Wire rack Use for cooling the cake evenly
- 1 Parchment Paper Optional, but makes unmolding a breeze
Ingredients
For the Base Batter:
- 1 ¾ cups all-purpose flour Sifted if possible
- 1 ½ tsp baking powder
- ½ tsp salt
- ½ cup unsalted butter Softened to room temperature
- 1 cup granulated sugar
- 3 large eggs At room temperature
- 1 tsp vanilla extract Use pure vanilla if available
- ⅔ cup whole milk Not cold, room temperature
For the Chocolate Swirl:
- ¼ cup unsweetened cocoa powder Bloomed in hot water
- 3 tbsp hot water Just boiled
- 1 tbsp granulated sugar To balance cocoa's bitterness
Instructions
- Preheat your oven to 350°F (175°C). Grease a 9×5 inch loaf pan and line it with parchment, leaving overhang for easy lifting later. Grandma always said, "Take care of your pan, and your cake will take care of you."
- In a medium bowl, whisk together the flour, baking powder, and salt. Set aside, like Grandma did on Sunday mornings with her favorite mixing bowl, always the same one.
- In a small bowl, whisk cocoa powder, hot water, and 1 tbsp sugar until smooth. Grandma called this "blooming the chocolate", her secret to deep flavor without bitterness.
- In a large bowl, beat softened butter and sugar for 3-4 minutes, until pale and fluffy. Jasmine remembers standing on a stool, watching Grandma's mixer swirl like magic.
- Add eggs one at a time, beating well after each. Stir in vanilla. The kitchen fills with that nostalgic scent Jasmine says "always smelled like comfort and cake."
- Alternately add the dry ingredients and milk, starting and ending with flour. Mix just until combined, don’t overmix, Grandma warned, or the cake will “turn grumpy.”
- Pour 2/3 of the vanilla batter into the loaf pan. Mix a scoop of the remaining vanilla into the chocolate mixture to lighten it, Grandma’s trick to better swirls.
- Drop spoonfuls of the chocolate batter over the vanilla. Top with remaining vanilla. Swirl gently with a knife in figure-eight patterns. Jasmine still hears Grandma say, “Less is more when it comes to beauty.”
- Bake for 55–65 minutes, until a toothpick comes out with just a few crumbs. Jasmine learned to never trust just the surface, “Check the heart,” Grandma said.
- Cool the cake in the pan for 10 minutes, then lift it out using the parchment. Let it cool completely before slicing to reveal the magical marble inside.
Notes
- For a richer flavor, you can use sour cream in place of milk, Grandma did that when she had some leftover from Sunday brunch.
- This cake actually tastes even better the next day. Wrap it tightly and let the flavors mingle overnight.
- Want a fun twist? Add orange zest to the vanilla batter for a chocolate-orange marble that Jasmine’s uncle loved on rainy days.
- Store at room temperature in an airtight container for up to 4 days, or freeze slices for later.

This cake recipe took me back to my Grandmother’s kitchen in Greece. The moment I took my first bite, I was flooded with memories of her warm, inviting home, filled with the sweet aroma of baking. The texture was spot-on; light and fluffy, just like I remember her cakes being. If you are looking for a delicious cake that does not require advanced baking skills, but still delivers impressive results, this is definitely the one to try. Thank you for sharing your recipe, Jasmine!
Thank you so much for this lovely comment. It truly means a lot. I’m so happy the recipe brought back those special memories from your grandmother’s kitchen. That’s exactly why I love sharing these recipes. I’m really glad you enjoyed it! 💛