
In our family, we believe a birthday celebration should start the moment you wake up! Why wait for cake in the evening? These red velvet marble waffles have become our favorite special occasion breakfast. They look just as festive and beautiful as a birthday cake, with their gorgeous swirls of red and white, making them the perfect birthday breakfast idea to start the day with a little bit of magic.
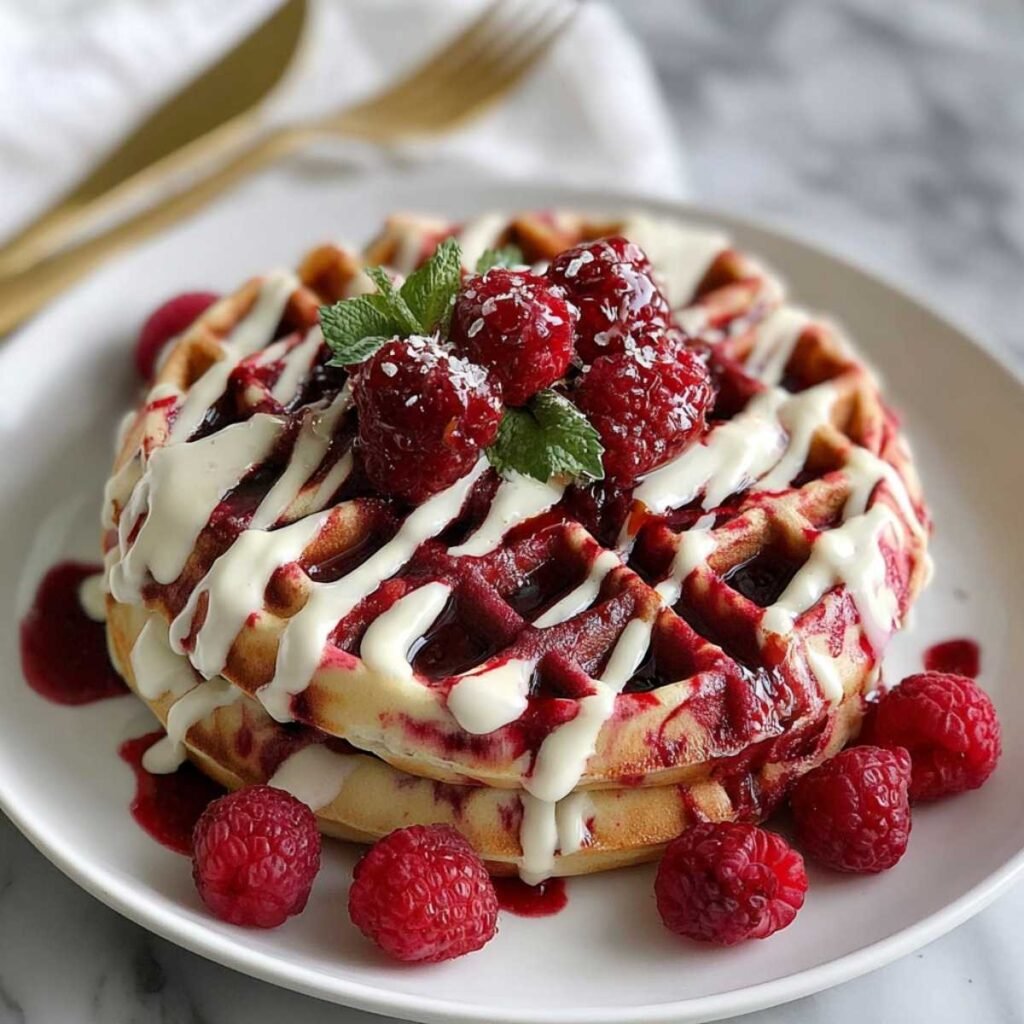
Picture fluffy, tender waffles with gorgeous crimson swirls dancing through creamy vanilla batter, creating that stunning marbled appearance that makes everyone stop and stare. This red velvet waffle mix recipe transforms your regular waffle iron into a canvas for the most beautiful breakfast art you’ve ever created. Whether it’s Valentine’s Day waffles, a special birthday morning, or you just want to make any day feel extraordinary, these waffles deliver that perfect blend of elegance and comfort that makes breakfast feel like dessert.
Jump To
Why You’ll Love This Red Velvet Marble Waffles
These Valentine’s Day waffles are absolutely stunning to look at and even more incredible to taste. The marble effect creates this gorgeous swirled pattern that looks like you spent hours creating when it actually takes just minutes to achieve. Each bite delivers that perfect balance of rich red velvet flavor with classic vanilla, creating a taste experience that’s both familiar and exciting.
The texture is what really sets these apart from regular waffles. The red velvet batter adds a subtle chocolate undertone and incredibly tender crumb, while the vanilla batter keeps things light and fluffy. When you swirl the batters together, you get this beautiful contrast that’s both visually stunning and absolutely delicious.
Using gel food coloring gives you that deep, vibrant red color without affecting the taste or texture. Plus, the cream cheese glaze on top? Pure heaven. It’s like having red velvet cake mix with cream cheese frosting in waffle form that’s perfect for sharing with someone special.
If you’re looking for more special breakfast treats, these Bisquick sausage egg and cheese muffins are another fantastic option for creating memorable morning meals.
Ingredients for Red Velvet Marble Waffles
This recipe combines the best of both worlds with two simple batters that create something absolutely extraordinary when swirled together.
What You’ll Need
For the Vanilla Batter:
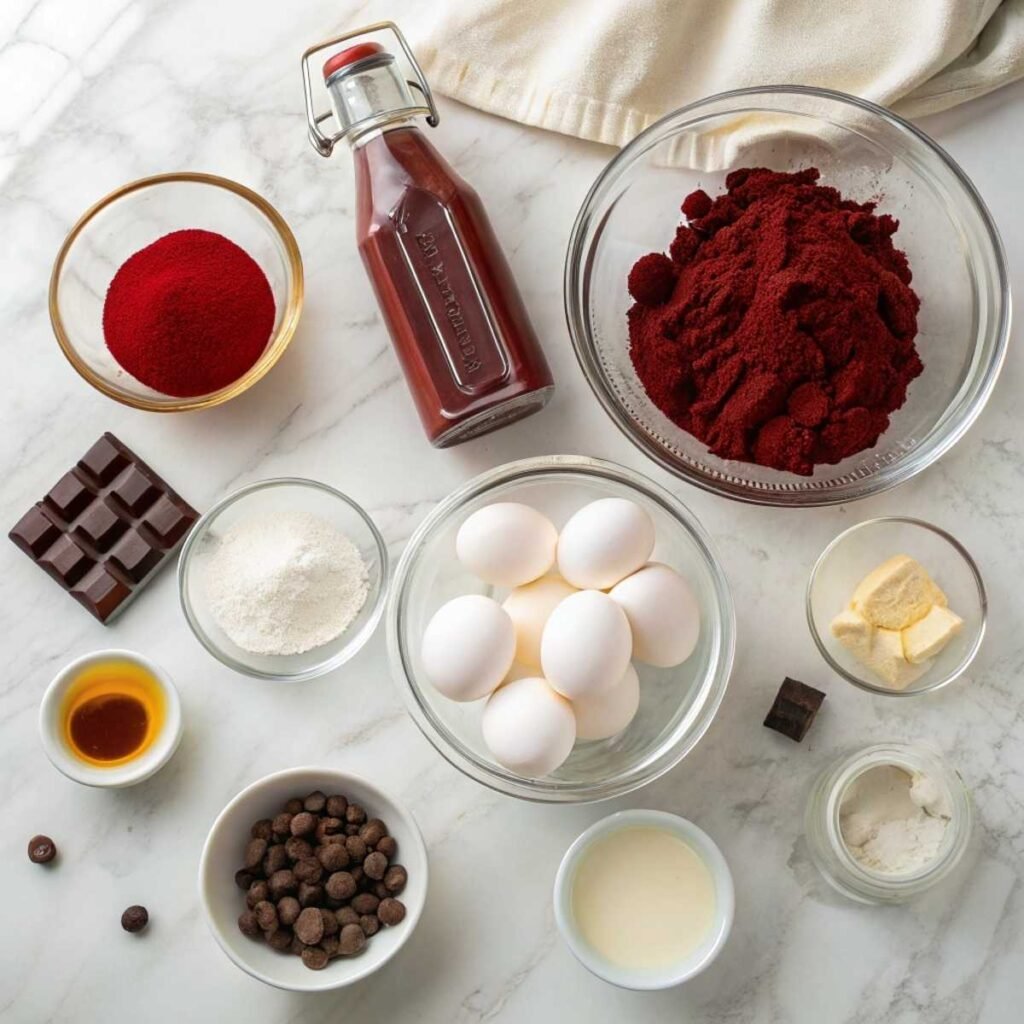
- 1 cup all-purpose flour
- 2 tablespoons sugar
- 2 teaspoons baking powder
- 1/2 teaspoon salt
- 1 cup milk
- 1/4 cup melted butter
- 1 large egg
- 1 teaspoon vanilla bean paste (or vanilla extract)
For the Red Velvet Batter:
- 1 cup all-purpose flour
- 2 tablespoons sugar
- 2 tablespoons cocoa powder
- 2 teaspoons baking powder
- 1/2 teaspoon salt
- 1 cup milk
- 1/4 cup melted butter
- 1 large egg
- 1 teaspoon vanilla extract
- 1-2 tablespoons red gel food coloring
- 1 teaspoon white vinegar
For the Cream Cheese Glaze:
- 4 oz cream cheese, softened
- 1/4 cup powdered sugar
- 2-3 tablespoons milk
- 1/2 teaspoon vanilla extract
Why These Ingredients Matter
The secret to perfect red velvet marble waffles lies in creating two distinct batters that complement each other beautifully. The vanilla batter provides that classic, light waffle base, while the red velvet batter adds richness with cocoa powder and that signature tang from the vinegar. Using gel food coloring instead of liquid food coloring gives you that vibrant red color without thinning out your red velvet waffle batter.
Greek yogurt can be substituted for some of the milk in either batter for extra protein and tanginess. The vanilla bean paste in the vanilla batter creates those beautiful little specks and intense vanilla flavor that makes the marble effect even more striking. The cream cheese glaze ties everything together with that classic red velvet cake frosting flavor that makes these easy red velvet waffles feel like a special dessert.
Instructions for Making Red Velvet Marble Waffles
Creating these stunning marbled waffles is easier than you might think. The key is preparing both batters properly and mastering the swirling technique.
Step-by-Step Directions
Step 1: Preheat your waffle iron according to manufacturer’s instructions. Lightly grease with cooking spray or butter.
Step 2: Make the vanilla batter first. In a large bowl, whisk together flour, sugar, baking powder, and salt. In another bowl, combine milk, melted butter, egg, and vanilla bean paste. Pour wet ingredients into dry ingredients and stir until just combined.
Step 3: For the red velvet batter, whisk together flour, sugar, cocoa powder, baking powder, and salt in a separate large bowl. In another bowl, combine milk, melted butter, egg, vanilla extract, red gel food coloring, and vinegar. Mix wet ingredients into dry ingredients until just combined.
Step 4: To create the marble effect, pour about 1/3 cup vanilla batter onto the waffle iron, then add 1/3 cup red velvet batter on top. Use a knife or toothpick to gently swirl the batters together, creating that beautiful marbled appearance.
Step 5: Close the waffle iron and cook according to your machine’s instructions, usually 3-5 minutes until golden and crispy.
Step 6: While waffles cook, make the cream cheese glaze by beating softened cream cheese, powdered sugar, milk, and vanilla until smooth and drizzly.
Step 7: Serve waffles immediately, drizzled with cream cheese glaze and any additional toppings you desire.
Step 8: Repeat with remaining batter, keeping finished waffles warm in a 200°F oven if needed.
Hint: Don’t overmix either batter! A few lumps are perfectly fine and will actually give you more tender waffles. Overmixing develops the gluten too much and creates tough, chewy waffles instead of light, fluffy ones.
Cooking Tips
The secret to crispy waffles lies in your waffle iron temperature and not opening it too early. Let the steam stop coming out before you peek, which usually takes about 4-5 minutes. The waffles should release easily when they’re properly cooked.
When creating the marble effect, less is more. Just a few gentle swirls with a knife or toothpick will create beautiful patterns. If you swirl too much, you’ll end up with muddy-looking batter instead of distinct marbled swirls. Make sure your red gel food coloring is well incorporated into the red velvet batter before you start cooking for the best visual contrast.
Keep finished waffles warm and crispy by placing them on a wire rack in a 200°F oven. Never stack them directly on top of each other, as this will make them soggy from trapped steam.
Just like with my frozen French toast sticks in air fryer recipe, the key to success is patience and not rushing the cooking process.
Personal Anecdote
My first attempt at making red velvet marble waffles was for my husband’s birthday last February. I’d seen a picture online and thought they looked so romantic and special, but I got carried away with the food coloring and swirling technique.
Well, I used liquid red food coloring instead of gel, and the batter turned pink and watery. When I tried to create the marble effect, I swirled so enthusiastically that everything just turned into one muddy purple mess. The waffles tasted fine, but they looked nothing like the gorgeous photos I’d been dreaming of.
Grandma called while I was staring at my purple waffle disaster, feeling so disappointed. “Jazzy,” she said, “cooking is like painting, honey. You need the right paint and a gentle hand. Too much mixing muddies the colors.” She taught me about gel coloring and the light touch needed for marbling. Now these waffles are our go-to for every special occasion.
Substitutions for Red Velvet Marble Waffles
This best red velvet waffle recipe adapts beautifully to different dietary needs and ingredient availability while maintaining that stunning visual appeal.
Gluten-free version – Use a 1:1 gluten-free flour blend in place of all-purpose flour in both batters. The texture will be slightly different but still delicious.
Dairy-free option – Replace milk with oat milk or almond milk, and use vegan butter instead of regular butter. For the glaze, use dairy-free cream cheese and plant-based milk.
Red velvet cake mix shortcut – You can use a box of red velvet cake mix for the red batter by following package directions for waffles, then pair it with homemade vanilla batter for the marble effect. This creates easy red velvet waffles made with cake mix.
Lighter version – Substitute half the milk with Greek yogurt in both batters for extra protein and a slight tang that complements the red velvet flavor beautifully.
No gel coloring – If you only have liquid food coloring, use it sparingly and reduce the milk by 1-2 tablespoons to compensate for the extra liquid.
Easy red velvet waffle mix recipe variation – Make a dry mix ahead of time by combining all the dry ingredients for both batters separately, then just add wet ingredients when you’re ready to cook.
Variations on Red Velvet Marble Waffles
Once you’ve mastered this basic technique, these creative variations will keep breakfast exciting and delicious.
Red velvet waffles with cream cheese frosting – Make a thicker cream cheese frosting instead of glaze by using less milk and adding a pinch of salt for that authentic red velvet cake experience.
Chocolate chip marble waffles – Add mini chocolate chips to both batters for extra indulgence that makes these feel even more like dessert for breakfast.
Strawberry marble variation – Replace the red velvet batter with a strawberry batter using freeze-dried strawberry powder and pink food coloring for a fruity twist.
Funfetti marble waffles – Use the vanilla batter base and add rainbow sprinkles to one portion while keeping the other plain for a fun, colorful marble effect.
Red velvet waffles with pancake mix – Use your favorite pancake mix as a base for the vanilla portion, adding cocoa powder and red coloring to half for an even easier version.
Cinnamon roll marble – Add cinnamon and brown sugar to one batter while keeping the other vanilla for a cozy, bakery-inspired breakfast treat.
Each variation follows the same swirling technique but offers completely different flavor profiles, much like how my butter swim biscuits recipe adapts to sweet and savory variations.
Equipment for Red Velvet Marble Waffles
Having the right tools makes creating these beautiful marble waffles much easier and ensures consistent results every time.
Belgian waffle iron – The deep pockets are perfect for holding the cream cheese glaze and creating those gorgeous thick waffles that showcase the marble pattern beautifully.
Two large mixing bowls – Essential for keeping the batters separate until you’re ready to create the marble effect.
Wire whisks – Help you mix each batter to the perfect consistency without overworking the gluten.
Measuring cups and spoons – Accuracy is important for the proper batter consistency and color development.
Knife or toothpick – For creating those beautiful marble swirls in the waffle iron.
Wire cooling rack – Keeps finished waffles crispy by allowing air circulation underneath.
A standard round waffle maker works too, but Belgian-style waffle irons create those deep pockets that are perfect for holding the cream cheese glaze and showcasing the beautiful marble patterns.
Storage Tips for Red Velvet Marble Waffles
These special waffles store and reheat beautifully, making them perfect for meal prep or making ahead for busy mornings.
Refrigerator storage – Store cooled waffles in an airtight container for up to 3 days. Layer them with parchment paper to prevent sticking.
Freezing instructions – Freeze individual waffles on a baking sheet, then transfer to freezer bags for up to 3 months. They reheat perfectly from frozen.
Reheating methods – Toaster works best for maintaining crispiness. Oven at 350°F for 5-7 minutes also works well. Avoid the microwave as it makes them soggy.
Batter storage – Both batters can be made the night before and stored separately in the refrigerator. Just give them a gentle stir before using.
Glaze storage – The cream cheese glaze keeps in the refrigerator for up to a week. Let it come to room temperature and whisk before using.
The marble pattern actually looks even more defined after the waffles have cooled slightly, making them perfect for special occasion breakfasts or brunch entertaining.
For more make-ahead breakfast ideas, this crack breakfast casserole recipe is another fantastic option for feeding a crowd without morning stress.
Grandma’s Secret for Red Velvet Marble Waffles
Grandma’s secret to the most beautiful marble waffles? She always adds a tiny pinch of espresso powder to the red velvet batter. “Jazzy,” she told me with that knowing wink, “coffee doesn’t make it taste like coffee, honey. It makes the chocolate deeper and the red more vibrant. It’s like adding a whisper of magic that nobody can identify but everyone can taste.”
Her other crucial tip is about the swirling technique: “Think of painting watercolors, sweet girl. You want gentle, confident strokes that let each color shine. Too much fussing muddies the beauty.” She taught me to swirl just three times in different directions, then stop.
She also insists on letting the batter rest for 2-3 minutes after mixing each one. “Good batters need a little time to think about what they want to become. Patience makes them tender and perfect.”
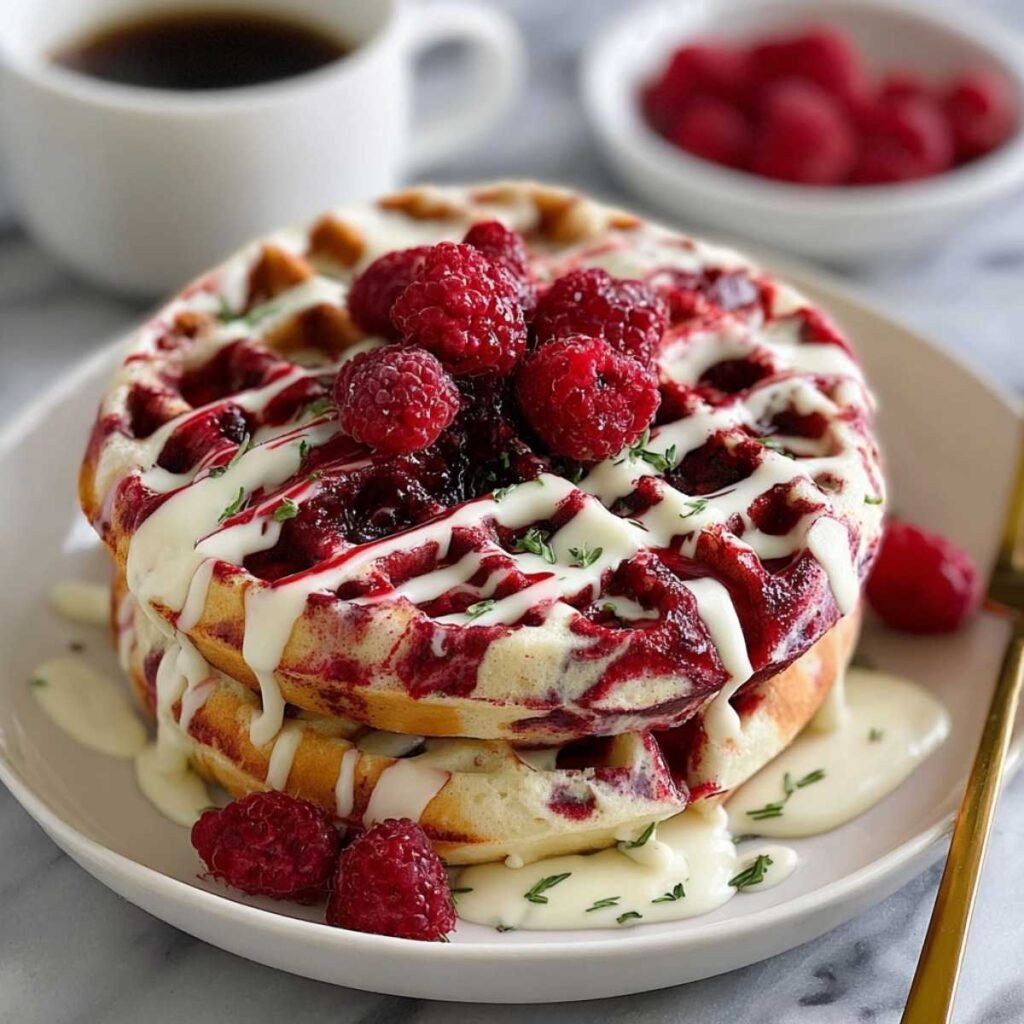
These stunning red velvet marble waffles showcase gorgeous crimson swirls against creamy vanilla, topped with luscious cream cheese glaze that makes breakfast feel like pure celebration.
FAQ about Red Velvet Marble Waffles
Can you use red velvet cake mix for waffles?
Absolutely! You can use a box of red velvet cake mix to make one of the batters. Follow the package directions but reduce the liquid slightly since waffle batter should be thicker than cake batter. Pair it with homemade vanilla batter for the beautiful marble effect. This creates an easy red velvet waffle recipe using cake mix.
What’s the secret to crispy waffles?
The key is proper temperature and timing. Let your waffle iron get fully heated, don’t open it too early (wait until steam stops coming out), and avoid overmixing the batter. Also, serve immediately or keep warm on a wire rack in a low oven to maintain crispiness.
How to make 3 ingredient waffles?
While these marble waffles are more complex, basic 3-ingredient waffles use just pancake mix, an egg, and milk. However, for the beautiful marble effect and red velvet flavor, the additional ingredients in this recipe are necessary for the best results.
Why are Norwegian waffles so good?
Norwegian waffles are traditionally made with cardamom and have a lighter, more delicate texture. They’re cooked in heart-shaped waffle irons and often served with sour cream and jam. The technique of not overmixing batter, which we use in this recipe, is similar to traditional Norwegian methods.
Conclusion
Who says celebrations have to wait until evening? These red velvet marble waffles prove that the most special moments can happen right at the breakfast table, setting the tone for an entire day of joy and celebration. Whether you’re celebrating Valentine’s Day, marking a special birthday, or just want to make an ordinary morning feel extraordinary, this recipe delivers that perfect combination of visual drama and incredible flavor that transforms breakfast into something magical. For more breakfast inspiration, check out these amazing tender and easy buttermilk waffles that pair beautifully with the techniques you’ve learned here.
Don’t forget to try this nutty quinoa breakfast bowl for those mornings when you want something healthy but still special, or indulge in these mozzarella corn dogs for a fun weekend brunch that the whole family will love. Here’s to starting our celebrations early and making sweet memories right from the breakfast table. I hope these beautiful waffles bring a little bit of that birthday morning magic to your family’s next special day.

Red Velvet Marble Waffles
Equipment
- 1 Belgian waffle iron Preheat thoroughly for crispy waffles
- 2 Large Mixing Bowls For keeping batters separate
- 2 Wire whisks One for each batter
- 1 Knife or toothpick For creating marble swirls
- 1 Wire cooling rack Keeps waffles crispy
- 1 Electric mixer For cream cheese glaze
Ingredients
Vanilla Batter:
- 1 cup All-purpose flour
- 2 tablespoons Sugar
- 2 teaspoons Baking powder
- 1/2 teaspoon Salt
- 1 cup Milk Room temperature
- 1/4 cup Melted butter Cooled slightly
- 1 large Egg Room temperature
- 1 teaspoon Vanilla bean paste Or vanilla extract
Red Velvet Batter:
- 1 cup All-purpose flour
- 2 tablespoons Sugar
- 2 tablespoons Cocoa powder Unsweetened
- 2 teaspoons Baking powder
- 1/2 teaspoon Salt
- 1 cup Milk Room temperature
- 1/4 cup Melted butter Cooled slightly
- 1 large Egg Room temperature
- 1 teaspoon Vanilla extract
- 1–2 tablespoons Red gel food coloring Gel works best
- 1 teaspoon White vinegar For tang
Cream Cheese Glaze:
- 4 ounces Cream cheese Softened
- 1/4 cup Powdered sugar Sifted
- 2–3 tablespoons Milk Adjust for consistency
- 1/2 teaspoon Vanilla extract
Instructions
- Preheat your [waffle iron] according to manufacturer's instructions and lightly grease with cooking spray or [butter]. Grandma always said "A hot iron makes crispy waffles – patience is the secret ingredient!" She'd test it with a drop of water that should sizzle immediately.
- In a large bowl, whisk together [flour], [sugar], [baking powder], and [salt] for the vanilla batter. In another bowl, combine [milk], [melted butter], [egg], and [vanilla bean paste]. Pour wet ingredients into dry and stir until just combined. Grandma's rule: "Lumps are your friends – they make tender waffles!"
- For the red velvet batter, whisk [flour], [sugar], [cocoa powder], [baking powder], and [salt] in a separate bowl. Mix [milk], [melted butter], [egg], [vanilla extract], [red gel food coloring], and [vinegar] in another bowl. The vinegar is Grandma's secret – "It makes the red pop and adds that special tang!" Combine wet and dry until just mixed.
- Let both batters rest for 2-3 minutes. Grandma taught me this crucial step: "Good batters need a moment to think about what they want to become. This makes them tender and perfect." She'd use this time to reheat her coffee and share a story.
- Pour about 1/3 cup [vanilla batter] onto the waffle iron, then add 1/3 cup [red velvet batter] on top. Use a knife or toothpick to gently swirl the batters together – just 3 swirls! Grandma's wisdom: "Think watercolor painting, not mixing paint. Too much swirling makes muddy colors."
- Close the waffle iron and cook for 3-5 minutes until steam stops escaping. Don't peek! Grandma would tap my hand if I tried: "Patience makes perfection, Jazzy. Let the steam do its magic." The waffles should release easily when done.
- Place finished waffles on a wire rack in a 200°F oven to stay crispy while you cook remaining batters. Never stack them! "They need to breathe," Grandma would say, "just like good bread."
- While waffles cook, beat [softened cream cheese], [powdered sugar], [milk], and [vanilla extract] until smooth and drizzly. Grandma always added a tiny pinch of salt: "It makes the sweet sing louder!" Adjust milk for perfect drizzling consistency.
- Drizzle warm waffles with [cream cheese glaze] and serve immediately. Grandma's presentation tip: "Food tastes better when it looks like love. A few berries on top never hurt either!" These are best enjoyed with someone special.
Notes
- Gel Food Coloring is Key: Liquid food coloring will thin the batter and create pink instead of red. Gel gives vibrant color without affecting texture.
- Room Temperature Ingredients: Let eggs and milk sit out for 30 minutes before starting. This helps create a smoother batter and better marble effect.
- Storage: Waffles keep in the refrigerator for 3 days or freeze for up to 3 months. Reheat in toaster for best results – never microwave!
- Gluten-Free Option: Use 1:1 gluten-free flour blend in both batters. Add 1 tablespoon extra milk if batter seems thick.
- Make-Ahead Tip: Mix dry ingredients for both batters the night before and store separately. In the morning, just add wet ingredients!
- Grandma’s Birthday Secret: She’d add a tiny drop of almond extract to the vanilla batter for birthdays – “It makes them taste like celebration!”
- Perfect Swirls: For best marble effect, use batters at the same temperature and consistency. If one is thicker, add a splash of milk to even them out.


2 thoughts on “Easy Red Velvet Marble Waffles”